
Noah’s Ark was created for Beginning with Genesis Ministries. It was done as a labor of love for the Dunckleys, Pastor & Mrs. Dr. Allen Dunckley. This was a massive project that I worked on between other jobs over approx. a four year period.
I had a couple of in-depth discussions with Pastor Dunckley that covered real world solutions and techniques for constructing such a vessel. All topics were covered from materials gathering to man power requirements, construction processes, number of animals and all of their needs, water, living quarters, anything you can imagine was covered. There a several good sources ( web sites ) that were recommended and that I used throughout my construction process;
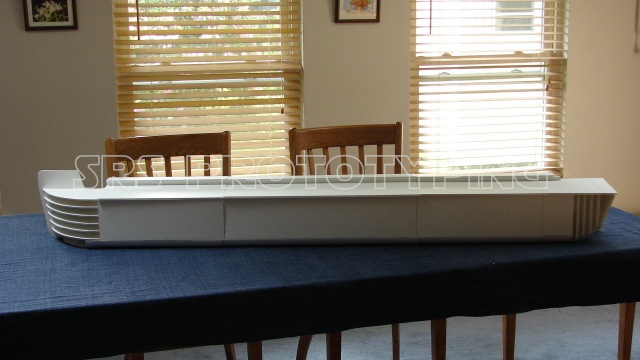
First step was, of course, the sketch/drawing phase. Basic dimensions of the Ark are 30 cubits tall by 50 cubits wide by 300 cubits long. There is a host of discussion on what the exact American Standard equivalent is, but Dr. Dunckley knew what he wanted to represent in the Ark, so that sped things up a bit. We did the calculations to arrive at the over-all dimensions of the Ark in HO scale and figured that a .026 thickness would be accurate for hull plank thickness. As the hull would be designed with a four layer plank on frame construction, I could use 1/4″ thick foam core board for the mock up, and .062, 1/16th, balsa strips for the actual model. With a model of such a scale as this, it was necessary to build a foam core board mock-up of the Ark first. With all of the other design concerns, this model also had to be transportable and that meant it also had to be light and durable. Just a few criteria to meet!
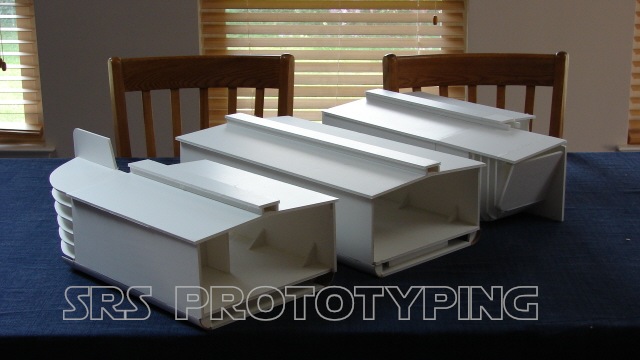
So, how am I going to hold the massive 72″ long mock up/volume study model together? Elmer’s white glue is very strong, but takes too long to dry, so hot glue was the logical choice for speed and strength. I originally cut the Ark into three sections that would fit together, so the mock-up represents that design. I also used a simple sloped stern design.
HO scale Noah’s Ark
HO scale Noah’s Ark
When approving the model, Dr. Dunckley wanted the stern changed to a more classic round design. I also changed the hull to be a two section design. This would make aligning the hull halves much easier than trying to align three. All changes were easy to do at this stage of development.
HO scale Noah’s Ark
HO scale Noah’s Ark
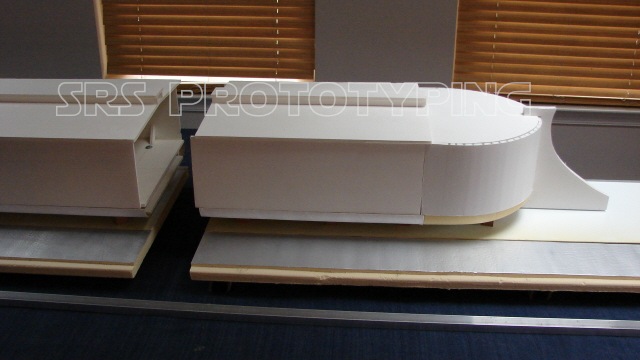
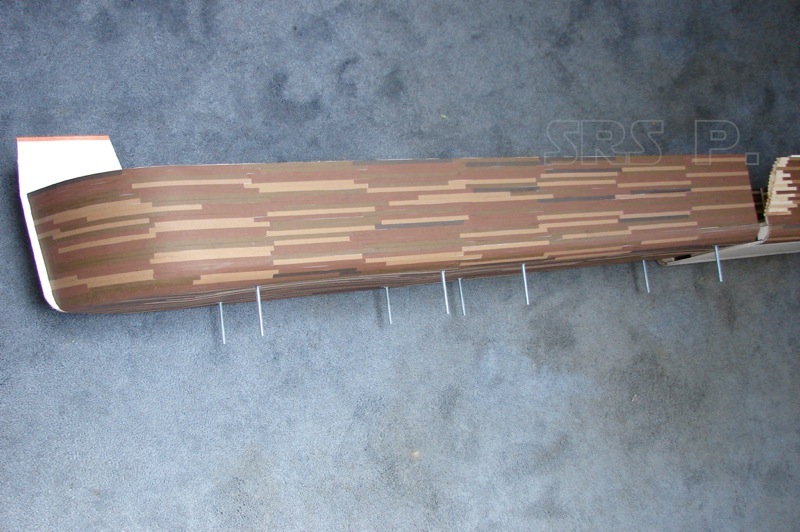
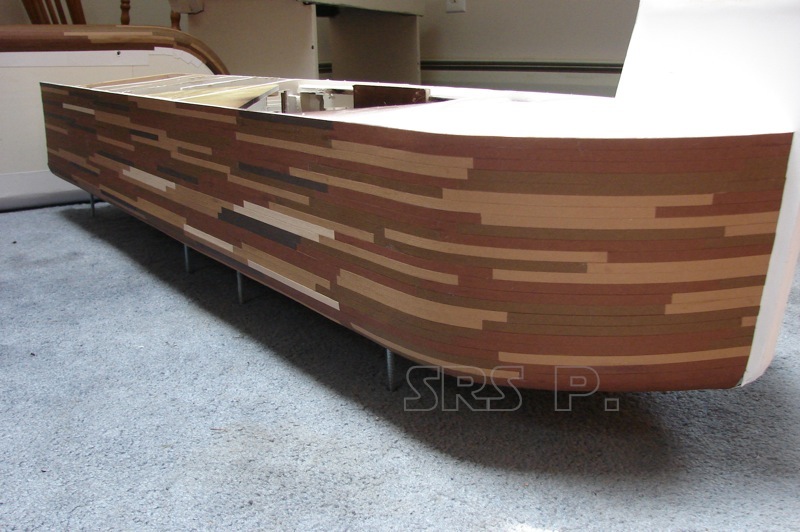
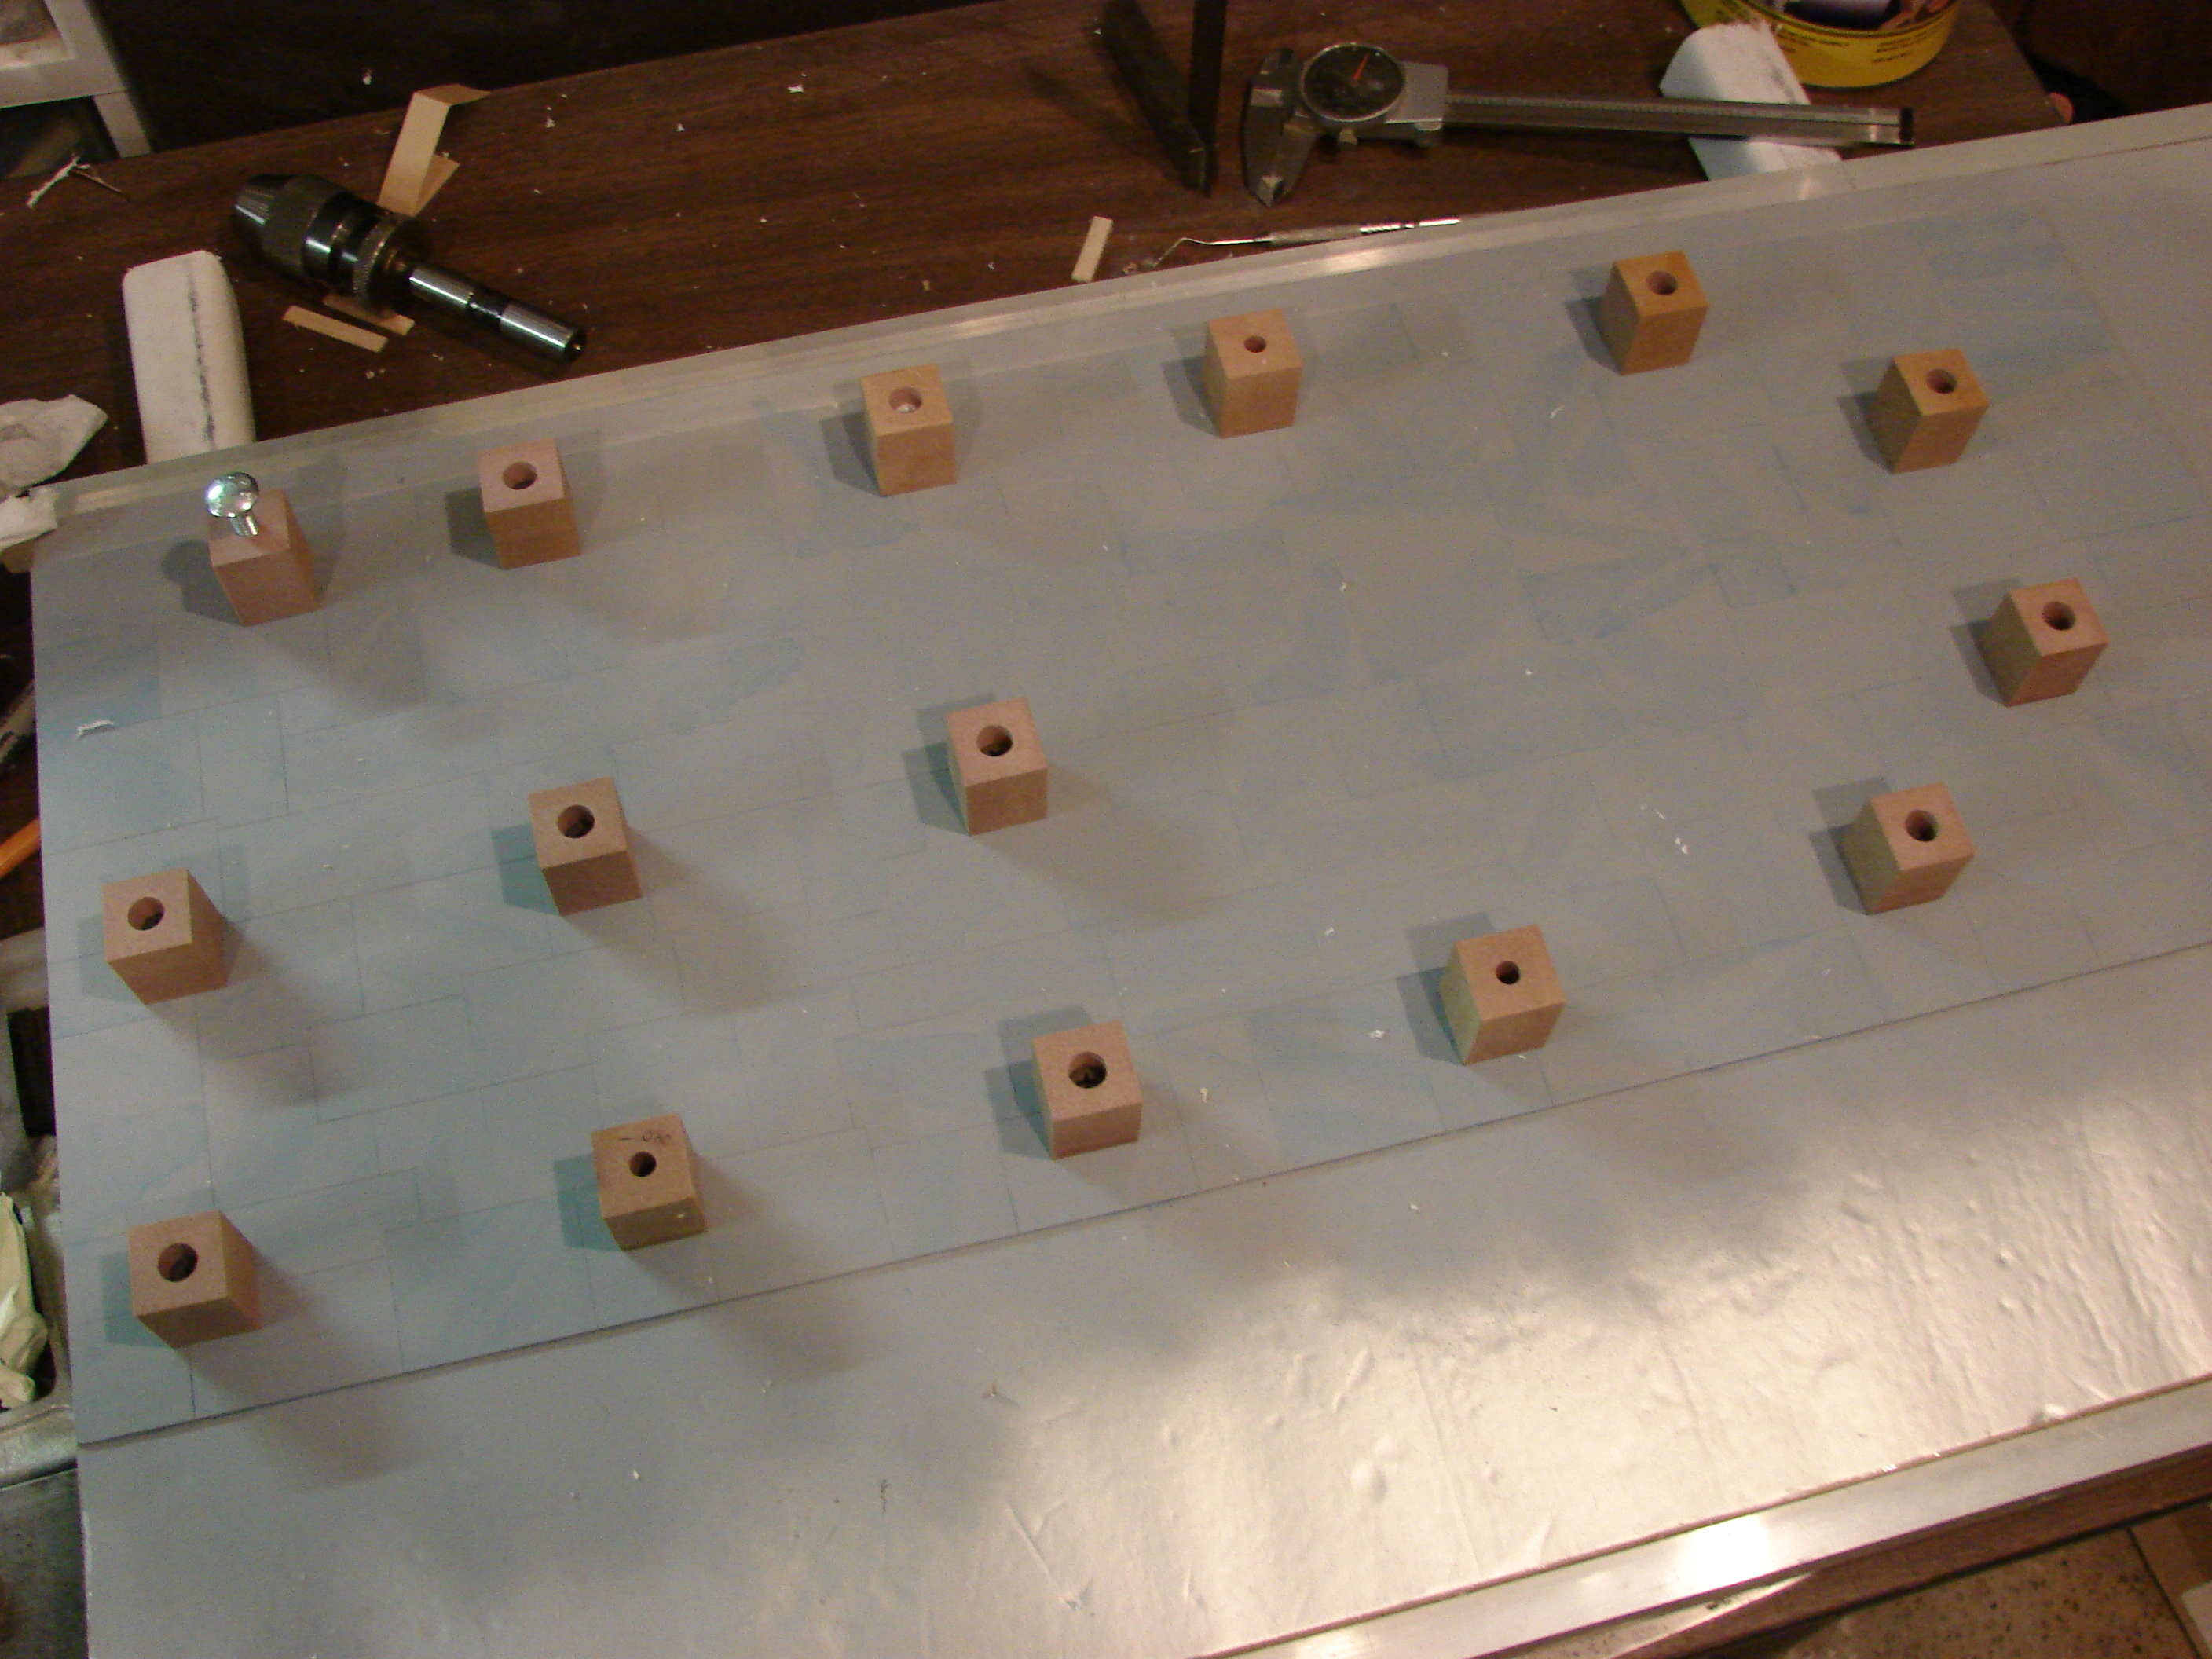
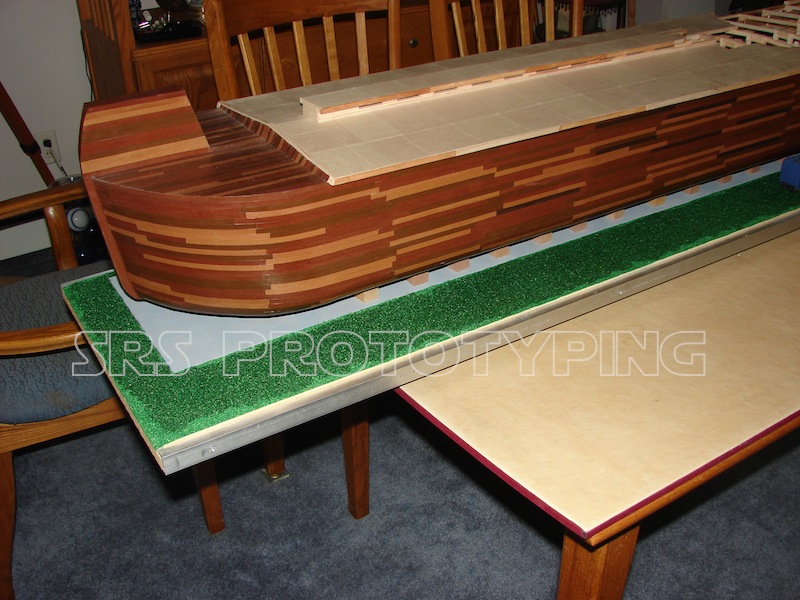
A couple of things to note in the above images. I have a platform in place to carry the model and align it for assembly. This was another of those challenges that had to be light and durable. I chose insulating foam panels, the kind used on building exteriors. They are strong and at the dimensions I was using, would not sag under weight. I used aluminum edging to keep the edges of the foam from getting damaged from transport and handling. The aluminum also provided a nice pocket to add the keys needed to align the two platform halves.
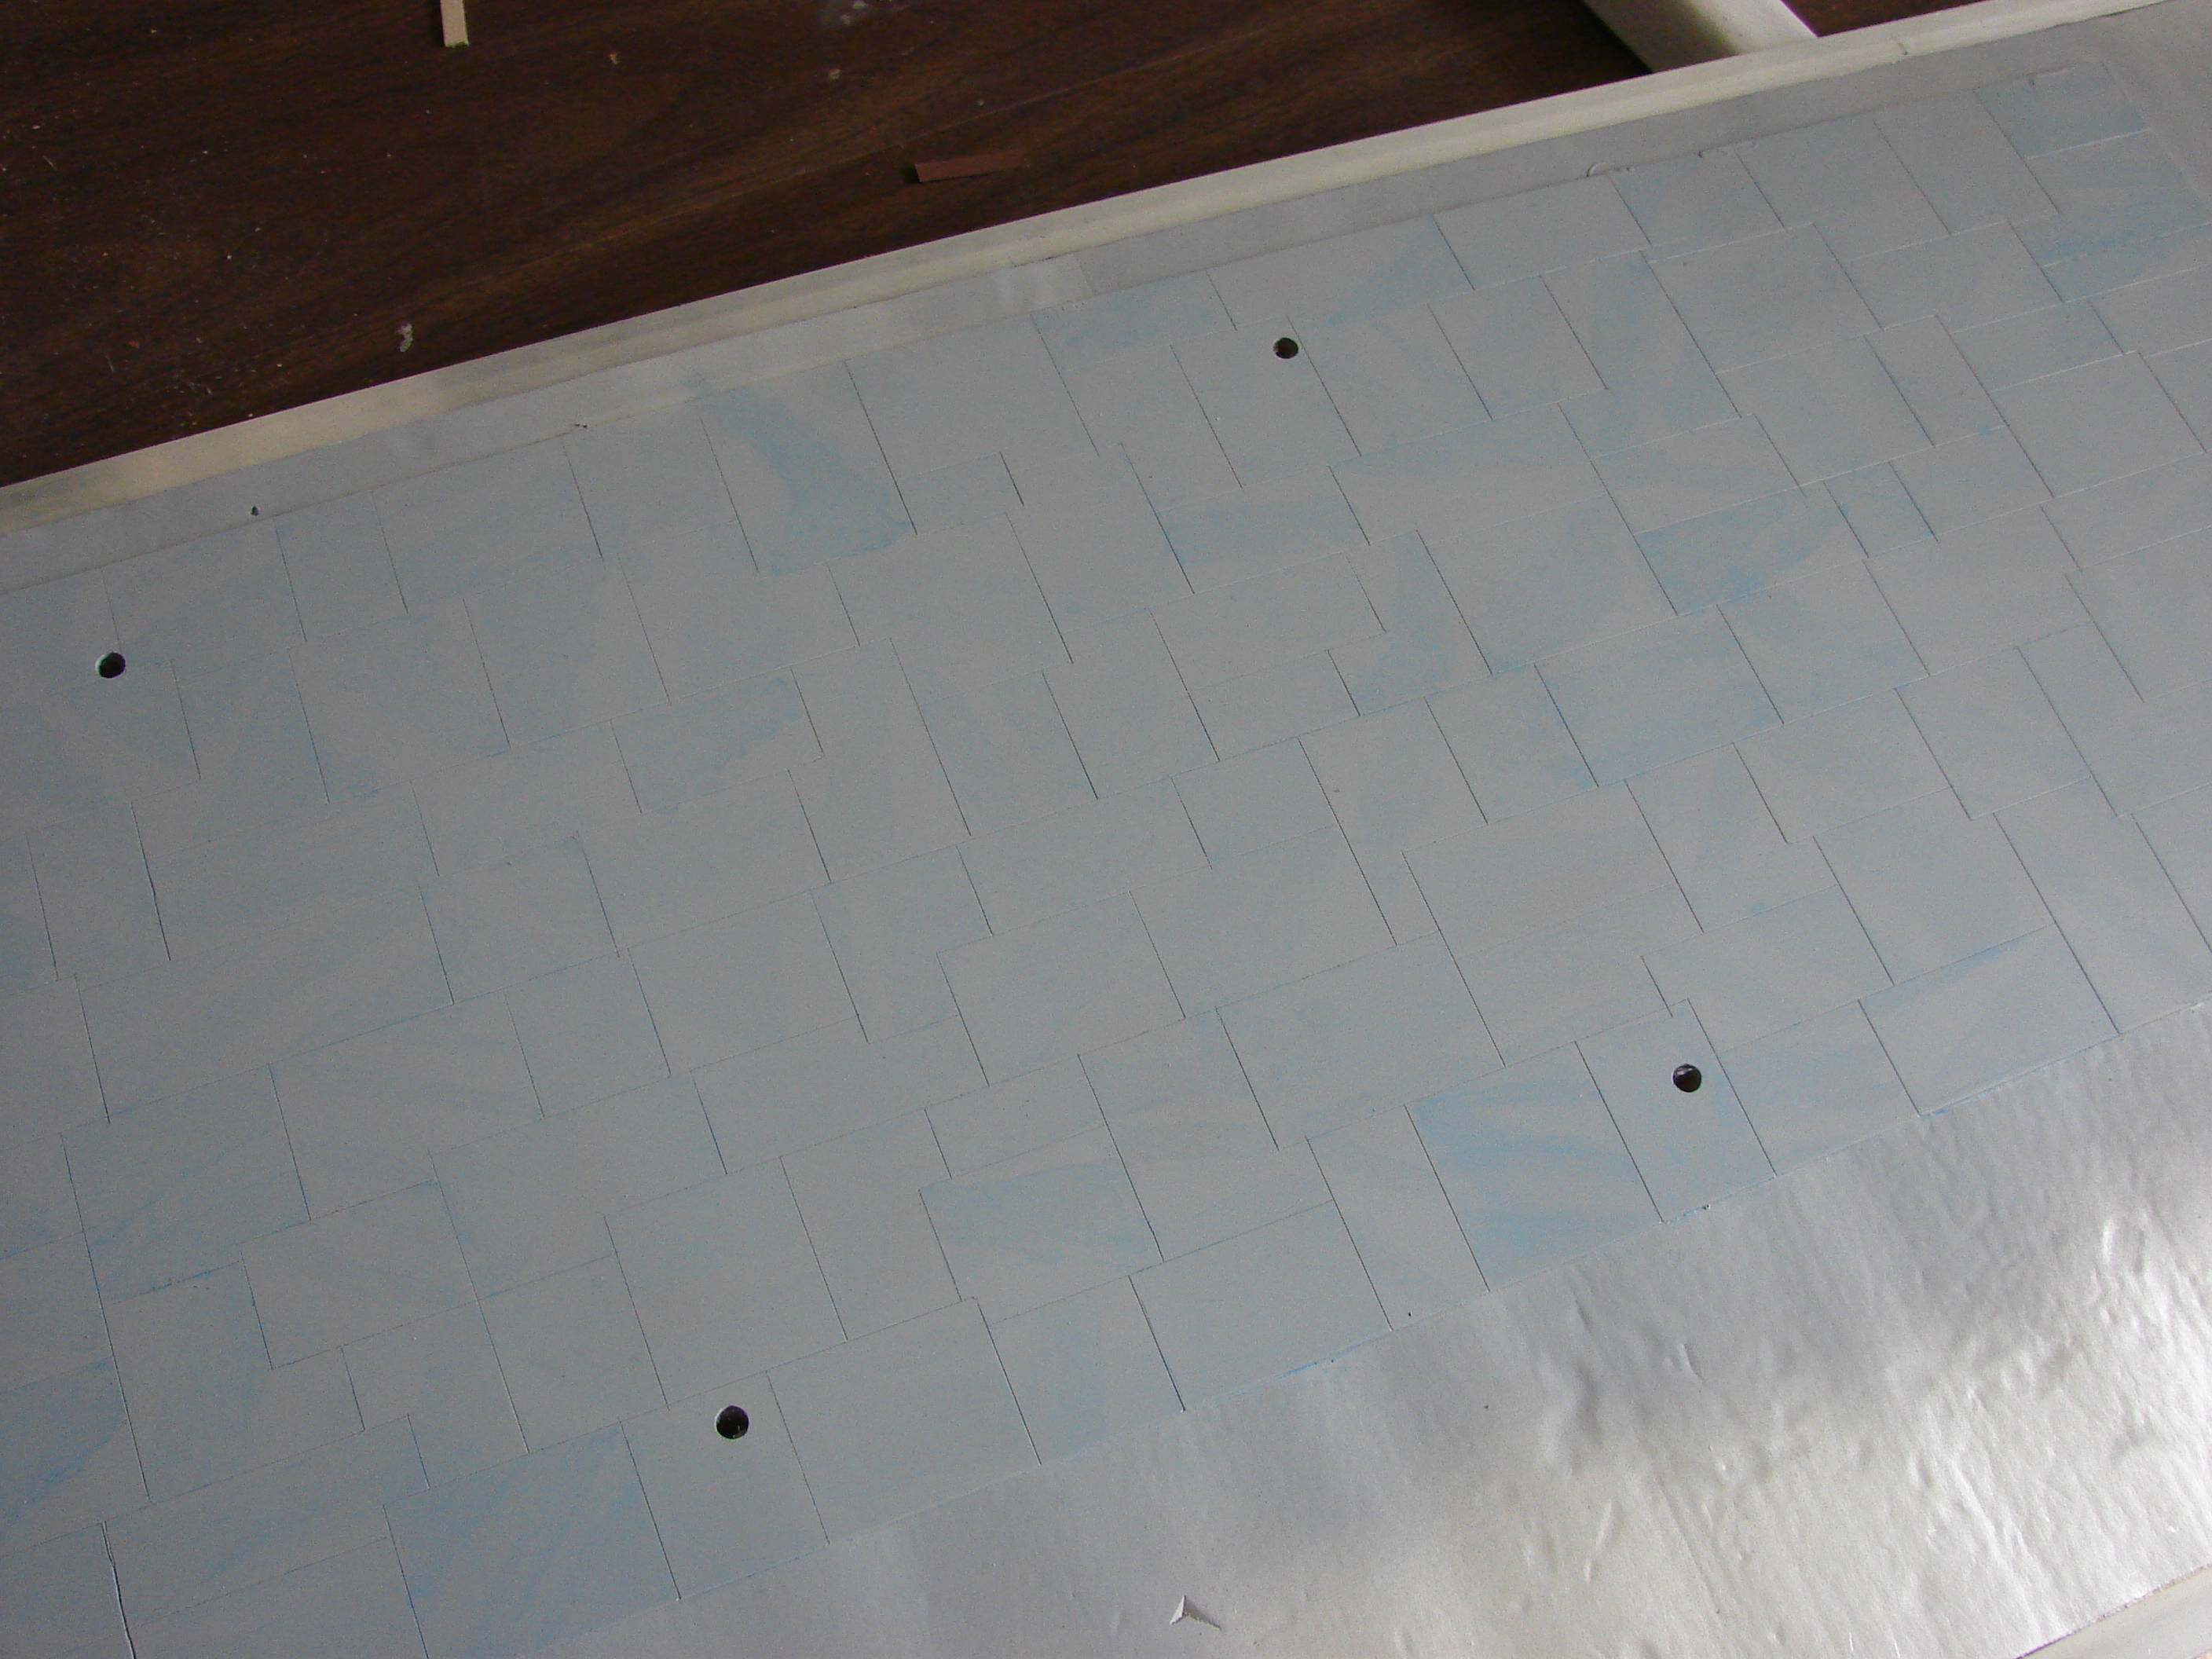
Also visible in the above images are the foundation blocks used to build the Ark on. My thoughts were as follows; the Ark is a massive building. Any massive building needs a foundation that will not sink into the ground to build it’s walls upon. So, I milled 1″square urethane blocks and spaced them evenly under the hull. Under these blocks you can see a white panel of styrene on the platform. In this piece of styrene I scribed a random interlocking block pattern. This is a granite foundation upon which everything rests. This boat aint goin’ no where!
Over time, I noticed that the foam core board was dimensionally stable, in other words, it did not warp at all with the changes of temperature or humidity. So rather than start over with another structure, I used the existing mock-up as the basis for the final model. Now, to cover the foam core with balsa strips. I would have to steam bend the strips to work with it and hand cut dozens to fit around the hull. Well, that would be extremely tedious and time consuming, so that was out. What to do………?
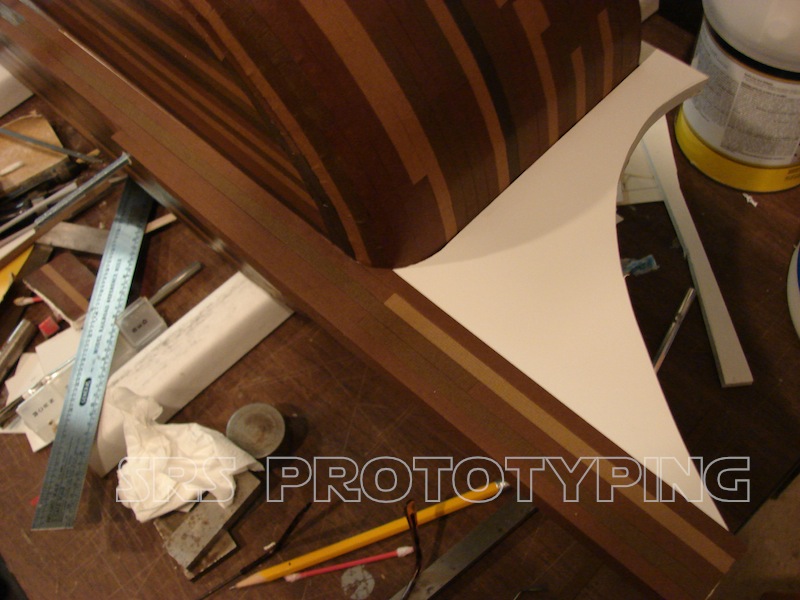
Paper! Paper would be the answer if I could find paper with a texture on it of wood or close to wood. I was not able to find any, so I had to turn the problem over to my resource department, my wife, who is a well versed internet ferret! With in ten minutes she found what I needed. She was able to find some with wood grain in it and in brown….bingo, I was saved! But the paper came in 12″ by 12″ square packs. I needed planking not sheets. After opening the packets of paper I could start to experiment with getting the paper to look like wood planking. I hand drew planking in pencil, but when put end to end, I could easily see the straight paper joint, no good. Then I cut the end of the sheet to match up with the plank pattern I did. That took for ever, no good. Then I started to hand cut 1/4″ strips for planking. That took even longer, no good again! I needed them cut into planking to look good on the model, that was the answer. I found a local printer that did binding and paper cutting. They had a precision paper cutter that could be adjusted, they thought, to 1/4″ to give me my strips. I took a packet of the paper, about 1″ thick, as a trial. They cut it no problem and to the 1/4″ width I needed…awesome!!!! What I did, was I first covered the foam core with white card stock paper. This would help hide any seems and smooth out the surface. I could even add body filler in certain areas and then cover that with card stock to eliminate any uneven surfaces. The card stock gave me a nice clean surface to work on. I then started laying the paper planking on one strip at a time, staggering the ends like a wooden hull would be. You can see the results below.
HO scale Noah’s Ark
HO scale Noah’s Ark
HO scale Noah’s Ark
HO scale Noah’s Ark
You can see how nicely the individual strips conform to the hull. Emler’s white glue was used to apply all of the paper applied to the foam core.
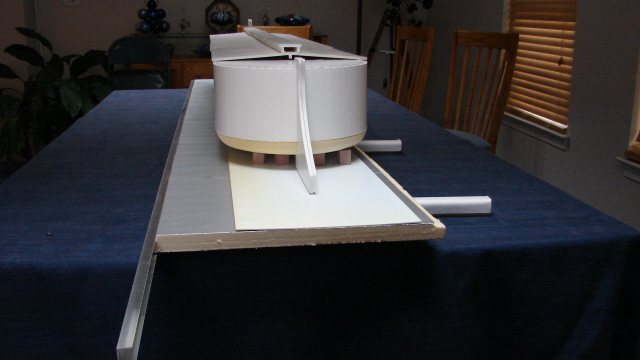
In the image above, you can see long bolts protruding from the bottom of the hull. These will hold the model down onto the base plate. They are hot glued into the hull and will be bolted and hot glued to the base plate from underneath. The following images show the styrene sheet decorated to look like stone with the support blocks in place with one bolt in position for reference.
HO scale Noah’s Ark
HO scale Noah’s Ark
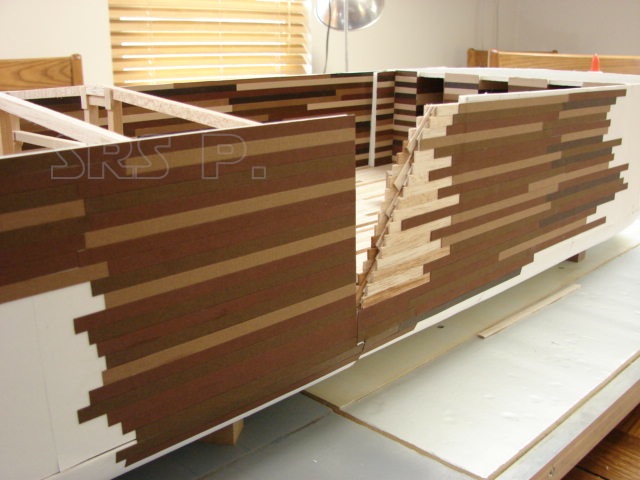
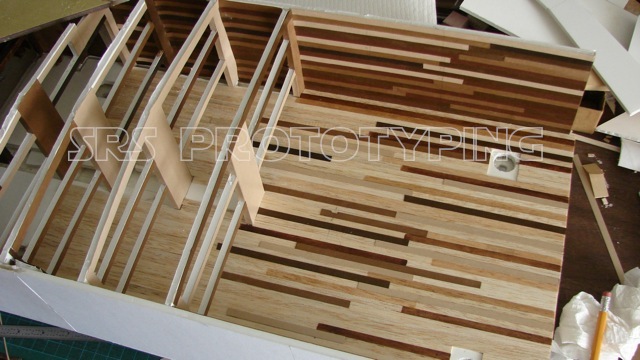
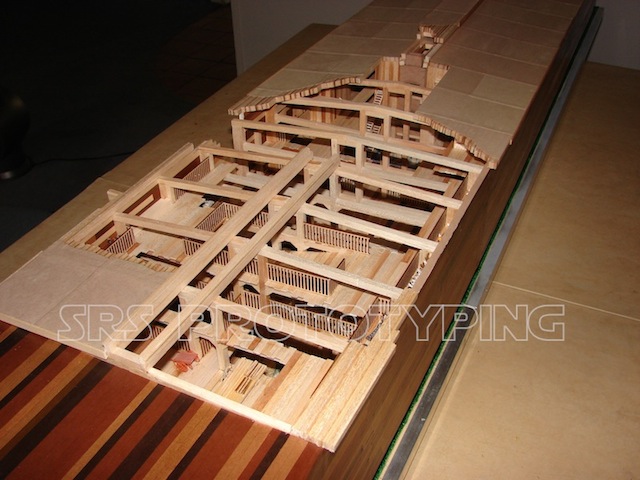
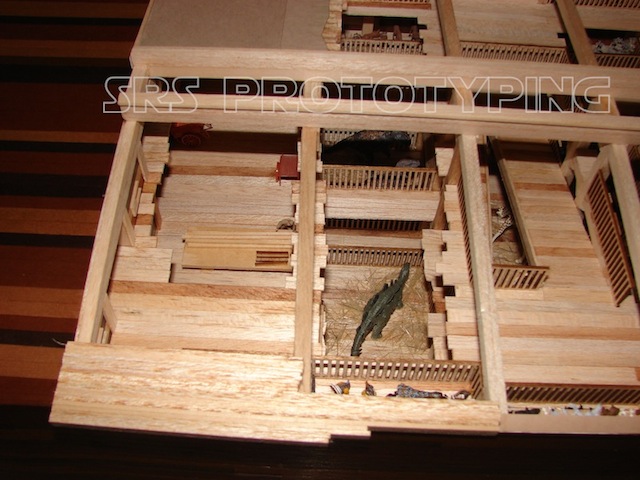
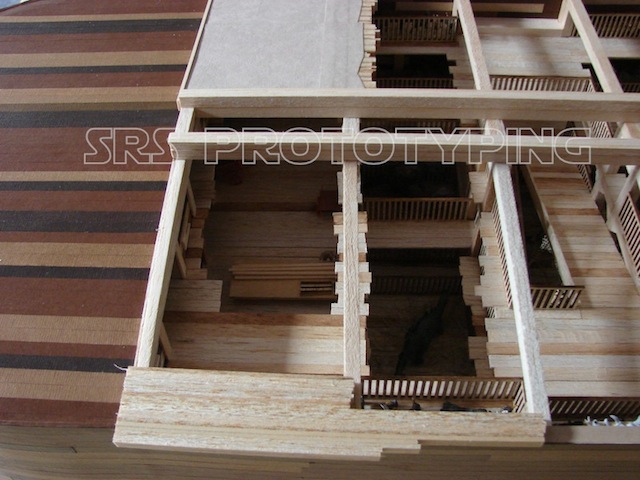
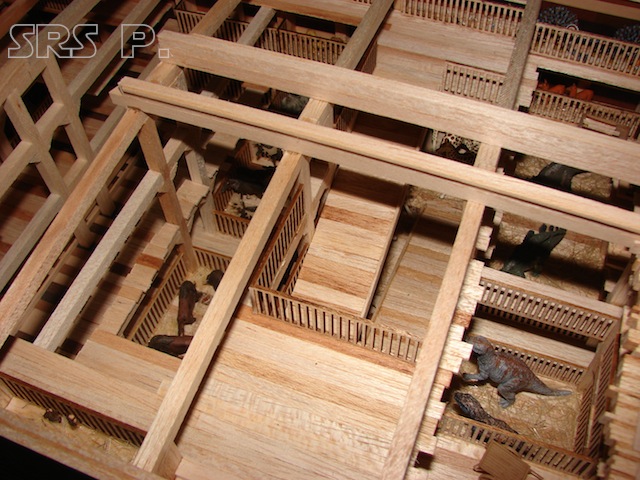
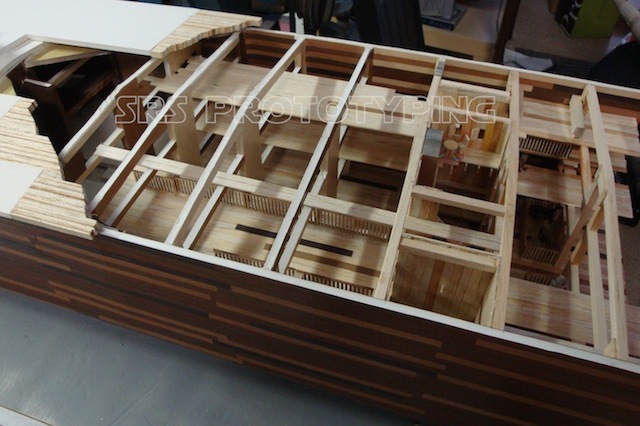
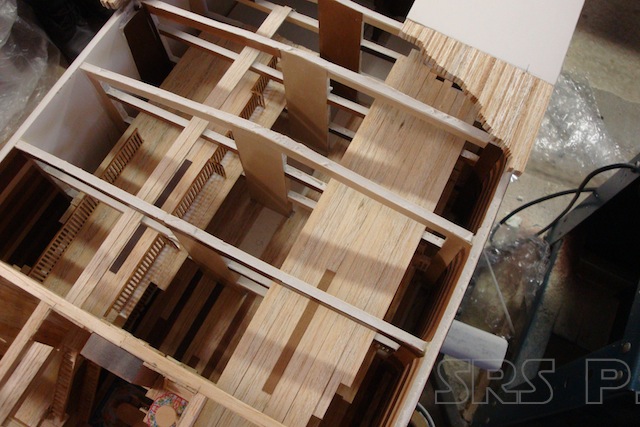
The interior was even more complicated than the outer hull. I can tell you, without going through all of the research and drawings created, that there are three floors divided into compartments, storage areas, animal pens and living quarters. All accommodated by the inner bulkheads. I started by creating one solid panel out of foam core that represented one bulkhead and test fit it along the hull where they would be placed. With minor adjustment, one panel fit in every position. I next copied that solid panel and then cut out for the three floors and central columns. Foam core was used for the bulkheads that were farthest away from the open section, where the two halves joined. These foam core pieces were covered with the different paper planks to simulate wood, in case anyone got a glimpse of them way up front in the hull. I needed to use balsa wood for those that would be visible. I used my solid panel to create one balsa bulkhead. This balsa part was used to create a jig on a flat panel to make gluing up the rest of them much easier and quicker. Once glued up, I used water color paint to tint the different parts so that they would not look like one giant piece of balsa wood. This helped keep them looking scale.
This image shows the forward most, towards the bow, foam walls in place. The floor has been covered with raw and painted balsa strips, the walls with paper. The open holes are for the mounting bolts.
HO scale Noah’s Ark

HO scale Noah’s Ark
The balsa walls being test fit with HO scale figures for scale. Each of thew two upper floors will be covered with balsa strips.
HO scale Noah’s Ark
HO scale Noah’s Ark
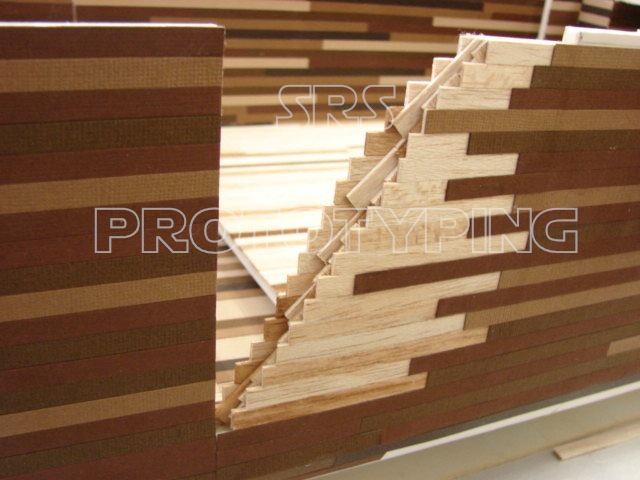
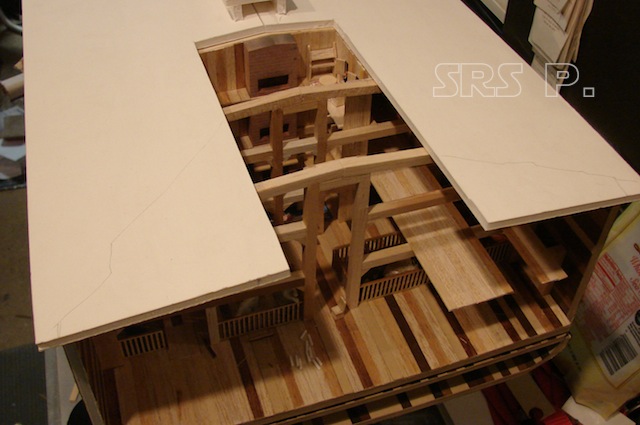
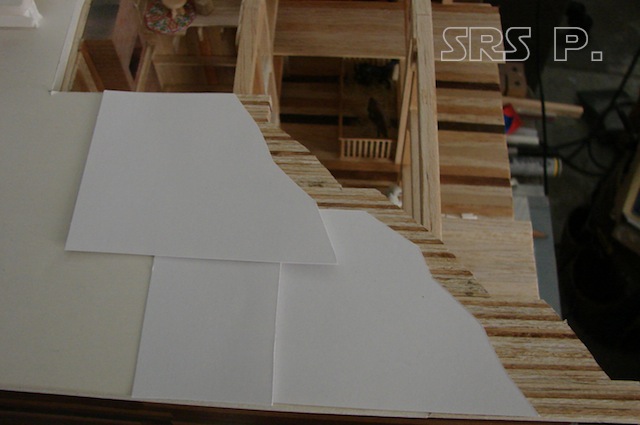
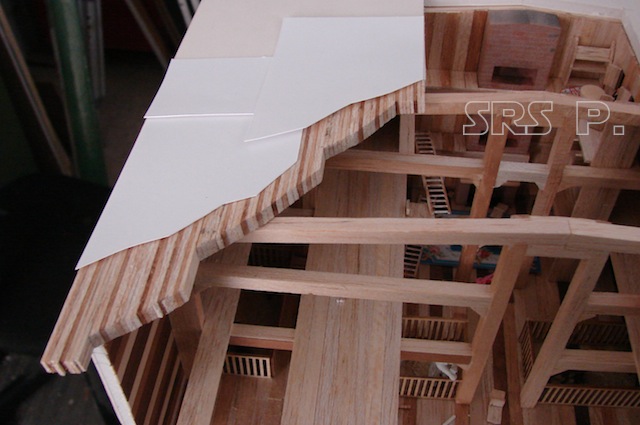
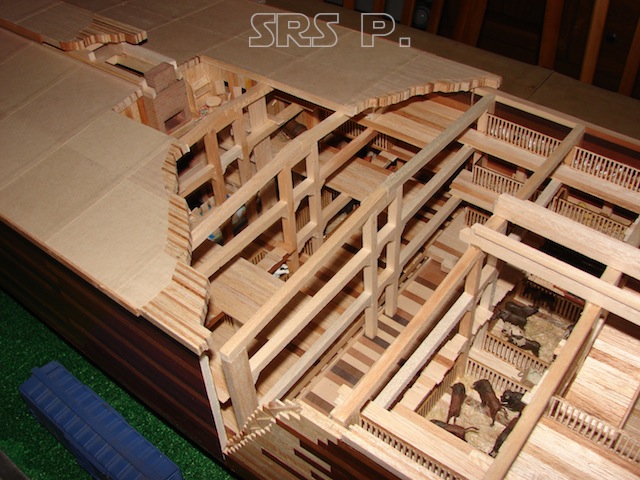
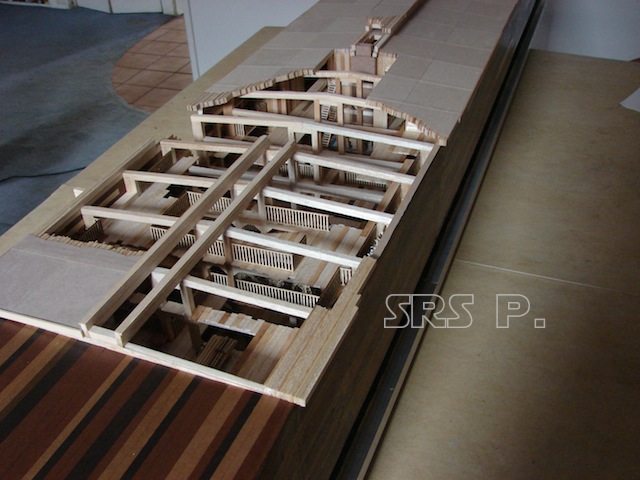
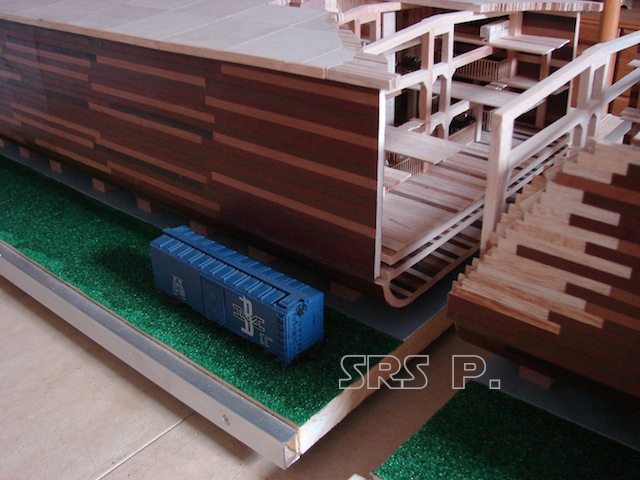
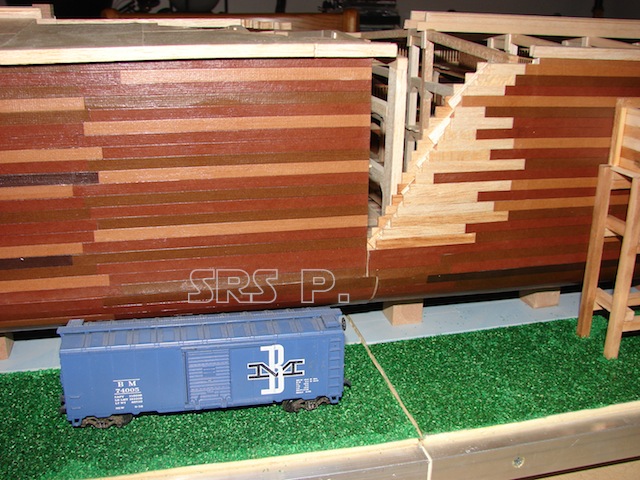
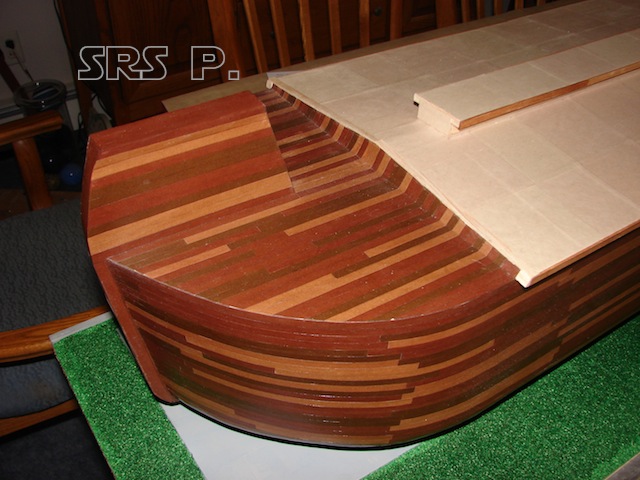
In some of the images there are areas of the Ark that are unfinished. This Ark is designed as a cut-away model and those sections are designed to reveal the inner structure and workings of this massive vessel. The whole purpose of the model is to educate us on how the Ark may have been constructed, supplied and populated. During the design phase I had to keep the cut-away aspect in mind so the model would be open to viewing but also still strong enough to survive transportation. I was limited as to what I could do. I knew I could open the roof & flooring up without too much difficulty, but the side had to open at some point to reveal how the hull was constructed. The most logical place to open the side of the hull is where the separation takes place between the two halves of the model. The objective was to show the four layers of the hull and how the planking was arranged for construction. Below is the cut-away section.
HO scale Noah’s Ark
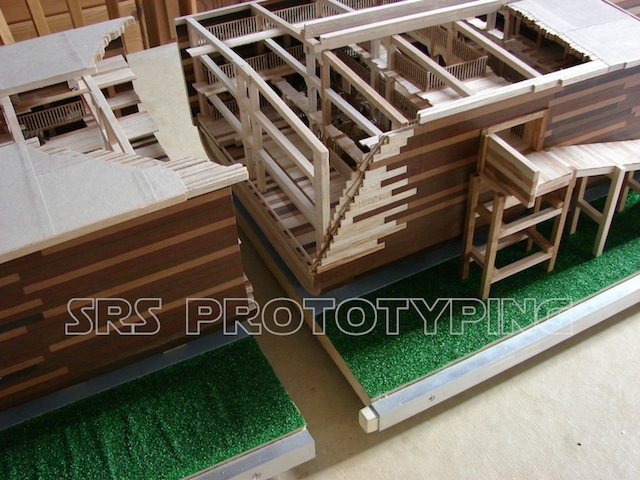
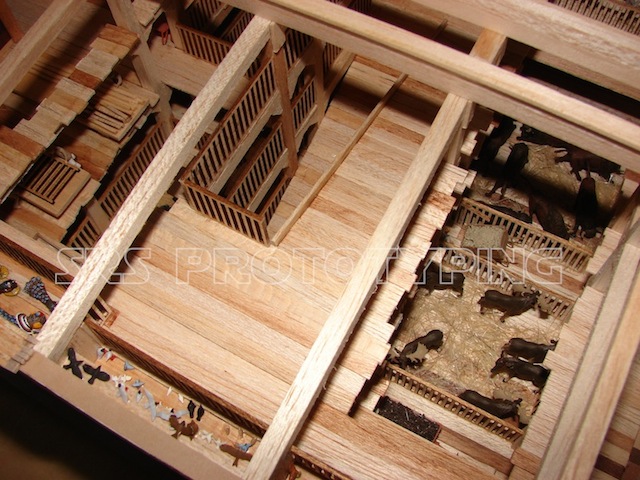
Along with the hull sub-structure, I also had to show below decks, the various animal pens, storage, etc. I decided that the rear section would be the best to open up as it was the shortest section and could with stand that much missing structures.
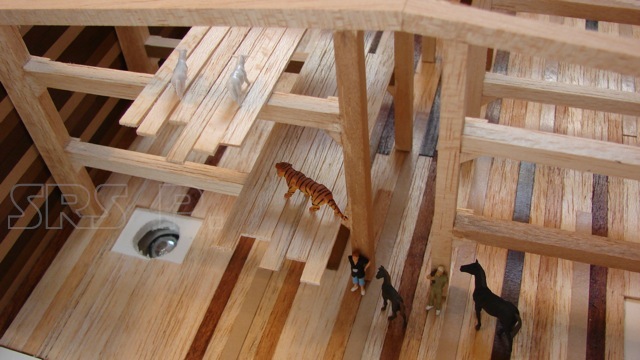
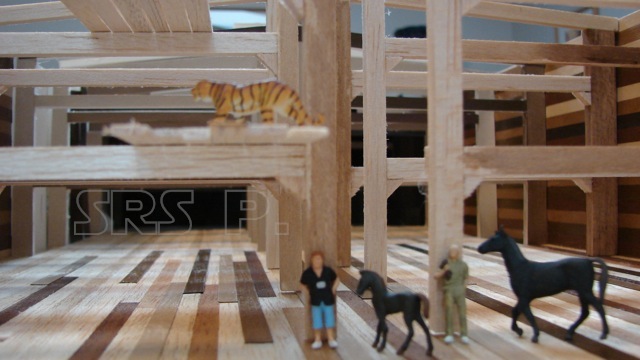
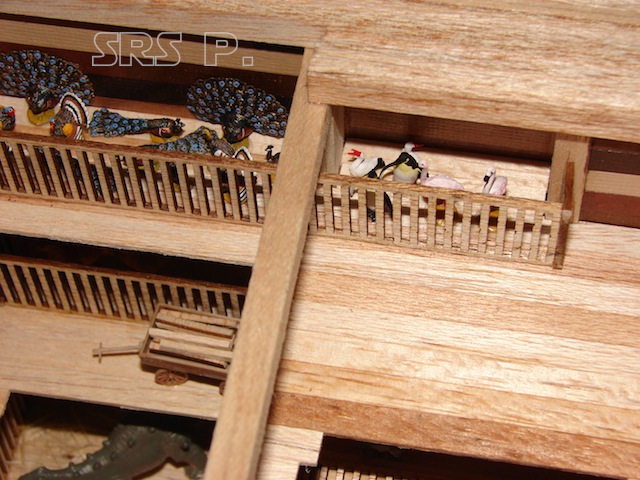
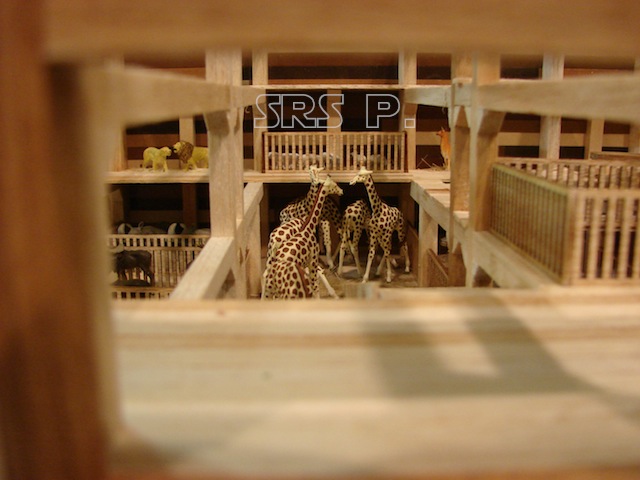
There was also a lot of planning on where to place which animal. Not every animal on the ark was in pairs only, of some there were seven. And, I did not have an HO representation of every kind of animal that would have been on the Ark so I had to use what I could get in the best place to show it. To help indicate where I was going to open up a floor section, I left the planking uneven, if I were to keep neat & straight edges on those sections it would be confusing as to what is a finished floor and what is cut-away. These are images of the stern section showing the animals and open sections.
HO scale Noah’s Ark
HO scale Noah’s Ark
HO scale Noah’s Ark
HO scale Noah’s Ark

HO scale Noah’s Ark
HO scale Noah’s Ark
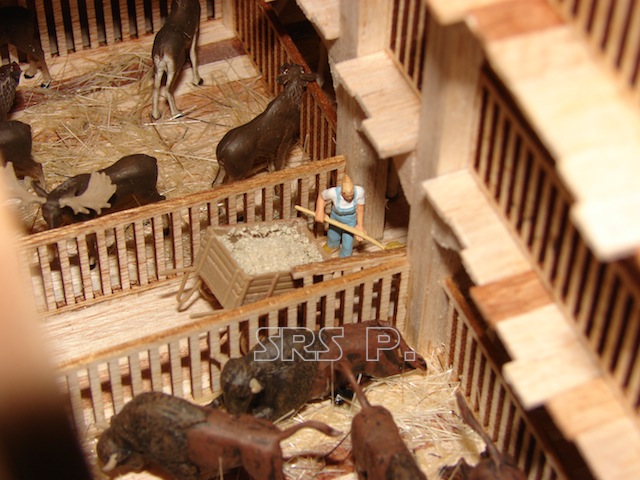
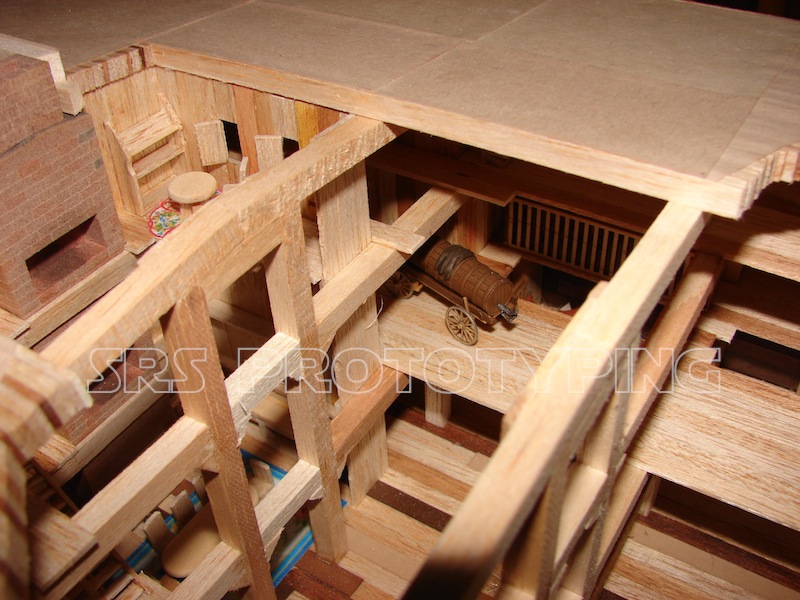
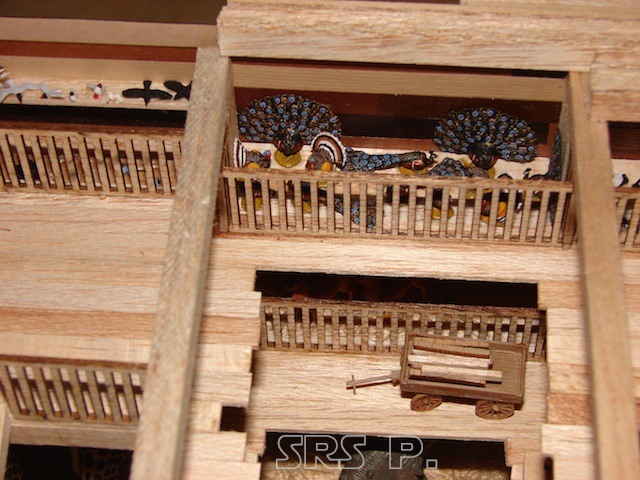
In the image above, the upper deck, on the right, has been cut away to reveal the lower deck showing the Moose and Bison there, along with a feed cart. To the left are the many types of birds. In the center is the main gangway to all floors, both animals and supplies are loaded this way. Here are some closer views…

HO scale Noah’s Ark
HO scale Noah’s Ark
HO scale Noah’s Ark
HO scale Noah’s Ark
The roof is not just a covering for the Ark, it also is a load bearing structure with a few additional functions that make it all work together to allow air flow without allowing water to spill inside. 90% of the roof over the stern section is not built to allow the interior to be seen. That is not the case for the bow section, which is the remaining two thirds of the model. I did need to show some of the interior of the forward section because I designed the main living quarters to be amid-ships, just forward of the separation. In this area I could show my idea of how the living quarters might be arranged and how the roof was constructed.
A main component to the roof is the ‘window’ which is referred to in the biblical texts. From all of the research I did, I found that the consensus was for a raised narrow skylight-type of design that runs almost the entire length of the Ark. This I included in the foam mock-up model. In the first image you can see the ‘skylight’ with openings spaced along its length;
HO scale Noah’s Ark
The small openings are more for air flow than for lighting. This next image shows that there is a short knee wall under the openings. This helps keep water from flowing into the openings and therefore the interior.
HO scale Noah’s Ark
This top view shows how an opening can exist in the roof and still be strong as a structure. You can also see how the roofs were built, by laying planks on their edges and then joined together. These planks were then covered with a type of canvas which was held in place by the ‘pitch’ that was used on all of the vessel. (‘Pitch’ as we know it is black and tar-like, but for Noah’s time it was more like a varnish that would dry clear or cloudy or perhaps even a yellowish tint.)

HO scale Noah’s Ark
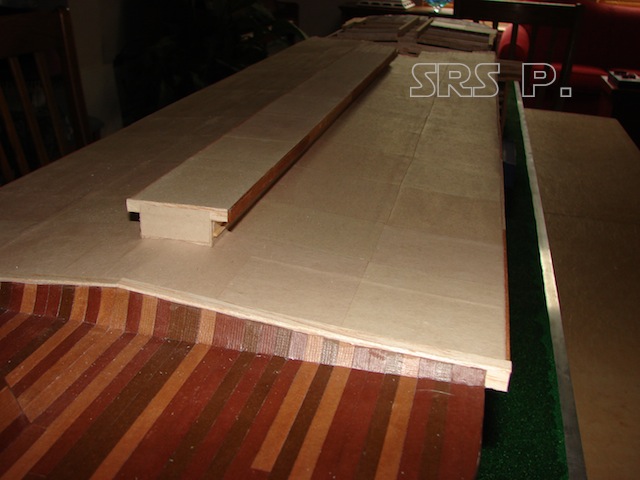
To the main roof itself; I first planned out how the cut-away section would look best and laid that out in pencil. I took that pencil line and made a guide that I could use once the foam core was cut away. I then notched the foam core back to allow for the balsa wood planking I would be adding. As with all of the planking, I hand painted more than half of them different wood tones to differentiate the planking so it would not look like a solid piece of wood. These planks were cut to length, stacked together on edge and glued together. I found I had to assemble the planking in short widths or they would tend to warp in an upward direction. Time consuming but worth the effort!
HO scale Noah’s Ark
Below on the far left, you can see the wood planks added onto the foam core.
HO scale Noah’s Ark
Card stock patterns for the roof canvas will cover the joint.
HO scale Noah’s Ark
HO scale Noah’s Ark
The canvas in place over the joints, can’t tell where the wood and foam core meet, perfect.
HO scale Noah’s Ark
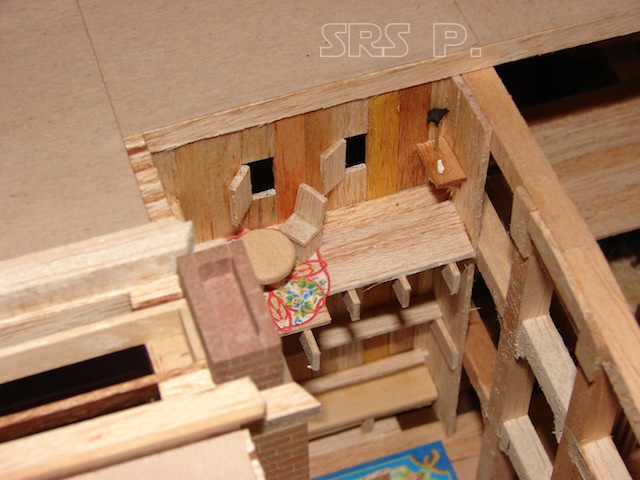
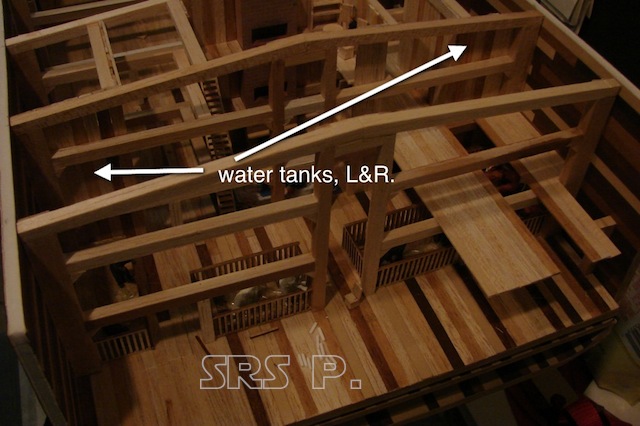
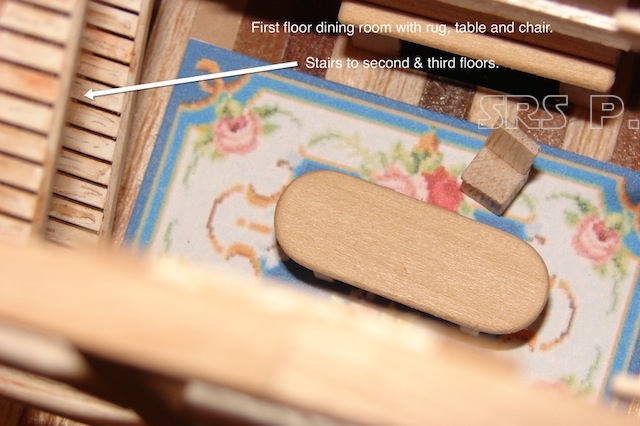
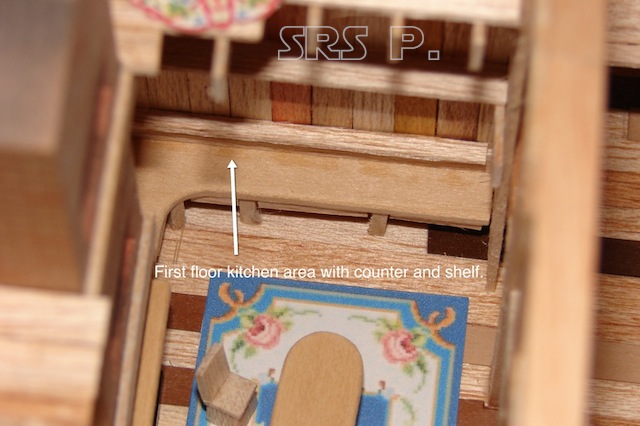
Time to talk about the living arrangements. The location and design of these quarters are totally from my own imagination. My thinking was that Noah and his family will be living on the Ark for more than a year, so why not be as comfortable as possible? I designed a central location that would minimize the effects of the pitch and roll of the vessel with a full eat-in kitchen with table and chairs and a large fire place for cooking and warmth. I also have the fire place function on all floors and vent out of the ‘skylight’. ( metal sheathing on the wood would keep it from catching fire) I also thought that this central location would be for Noah and his wife only for living quarters, the three sons and their wives would have their own quarters spaced throughout the interior. They would all dine together as a family on the first floor. Below you can see the three story arrangement with the fire places.
HO scale Noah’s Ark
This view focuses on the first or bottom floor. A nice rug, dining furniture, kitchen counter and a mantle over the fireplace is visible.

HO scale Noah’s Ark
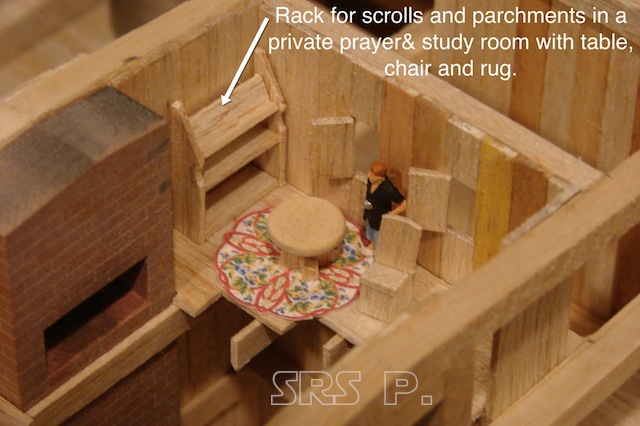
The top floor I envisioned as Noah’s private study where he would care for the crow and the dove. ( you can see them if you look closely)
HO scale Noah’s Ark
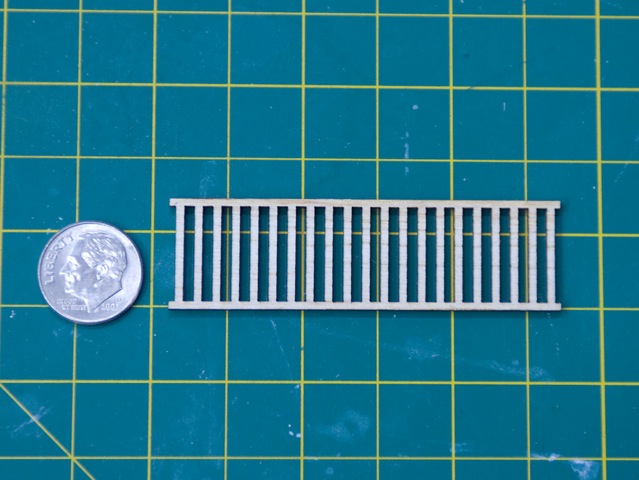
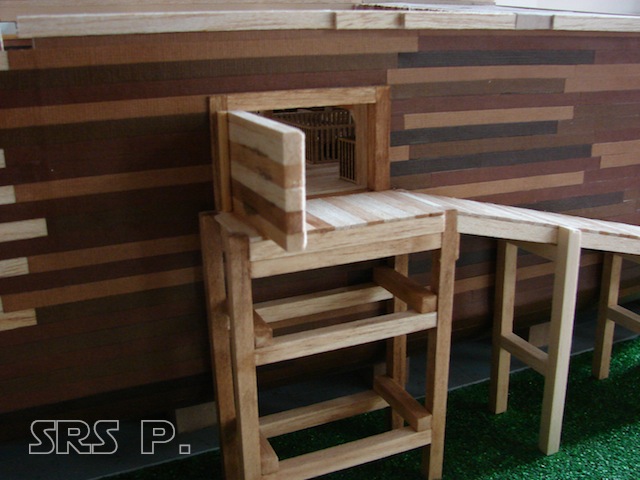
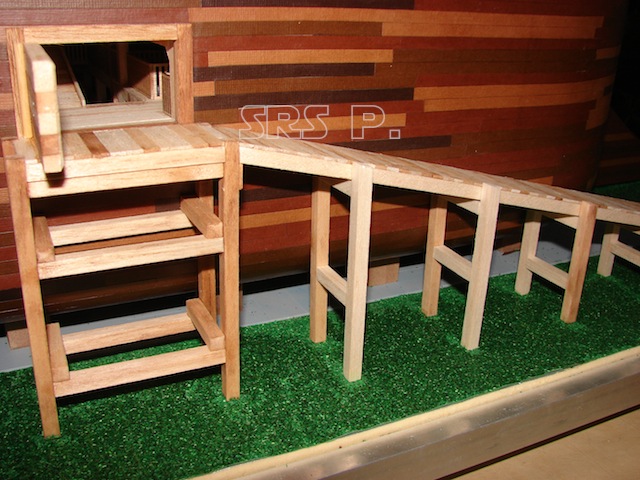
Another key component of the ark is the pens used to house all of the animals. I needed something that was simple and repeatable throughout the model. Building each by hand was out of the question due to the amount of time it would take. I thought about ordering scale fencing, but that would cost a fortune. I needed railings made of wood. I asked someone I know who does laser cutting in plastic, if they could cut balsa wood the same way. The answer was yes, so I was set. I supplied the sheet balsa and he cut out as many as I needed and they were not expensive at all. I used between 30 and 50 railings. The company was Laser Fire creations.
Below is the first railing cut, and they look great!
HO scale Noah’s Ark
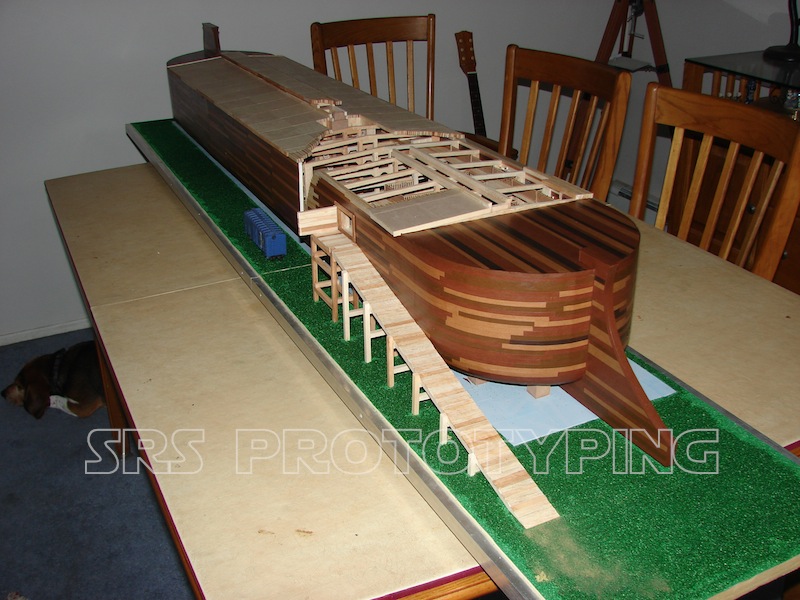
More images to guide you through my interpretation of Noah’s Ark in HO scale. The completed Ark is 72″ in length, with the base it is almost 80″ long!
HO scale Noah’s Ark
HO scale Noah’s Ark
HO scale Noah’s Ark
HO scale Noah’s Ark
HO scale Noah’s Ark
HO scale Noah’s Ark
HO scale Noah’s Ark

HO scale Noah’s Ark
HO scale Noah’s Ark
HO scale Noah’s Ark
HO scale Noah’s Ark
HO scale Noah’s Ark
HO scale Noah’s Ark
HO scale Noah’s Ark
HO scale Noah’s Ark
HO scale Noah’s Ark
To seal, protect and strengthen the completed model, every surface was covered with Elmer’s white glue. It dries clear and glossy on the paper, making the model appear as if it is covered with ‘pitch’ as mentioned earlier in the article.
Thanks for taking the time to read through this, I hope it is inspiring!